
Basement Beacon User Manual

What’s in the Box
In the standard Basement Beacon kit, you will have the following:
(1) Main Sensor Unit
(1) Power Monitor and 6’ Data Cable
(1) Floor Sensor and 6’ Data Cable
(1) 5V Power Supply
Downloading the App
iPhone: https://apps.apple.com/us/app/basement-beacon/id6756831796
Android: https://play.google.com/store/apps/details?id=com.basementbeacon.bb
Initial Setup
Creating an Account
You will need to create an account using the Basement Beacon app.
- Open the Basement Beacon app on your phone.
- If prompted to allow notifications, please do so. That way, the Basement Beacon app can send you alerts.
- On the main login page, scroll down and tap on Click to Register!
- Enter your email address, password, name, and address.
- Click: Create Account
Connecting the Main Sensor Unit to Your WiFi
After powering on your main sensor unit, you will need to connect to the Basement Beacon’s WiFi network to configure it.
- Connect the 5V power supply to the Basement Beacon Main Sensor Unit (MSU). The power jack is located on the right under the antenna.
- Plug the 5V power supply into an AC outlet.
- The MSU will beep twice to let you know it’s ready.
- On your phone, search for WiFi networks. Select the BBEACON WiFi network. The password is (in all lower case): basement
Android Users: Trouble Connecting to BBEACON?
Some Android phones may have difficulty connecting to the BBEACON Wi-Fi network because it does not provide internet access.
If you experience this issue:
- Connect to the BBEACON Wi-Fi network.
- If prompted that internet is unavailable, select Stay connected.
- Temporarily turn off Mobile Data in your phone's settings.
- Return to your browser and complete the Basement Beacon Wi-Fi setup.
- Once setup is complete, turn Mobile Data back on.
Continuing on...
- Open an Internet browser app on your phone and navigate to: http://192.168.14.1
- You will see a web page that looks like the following:
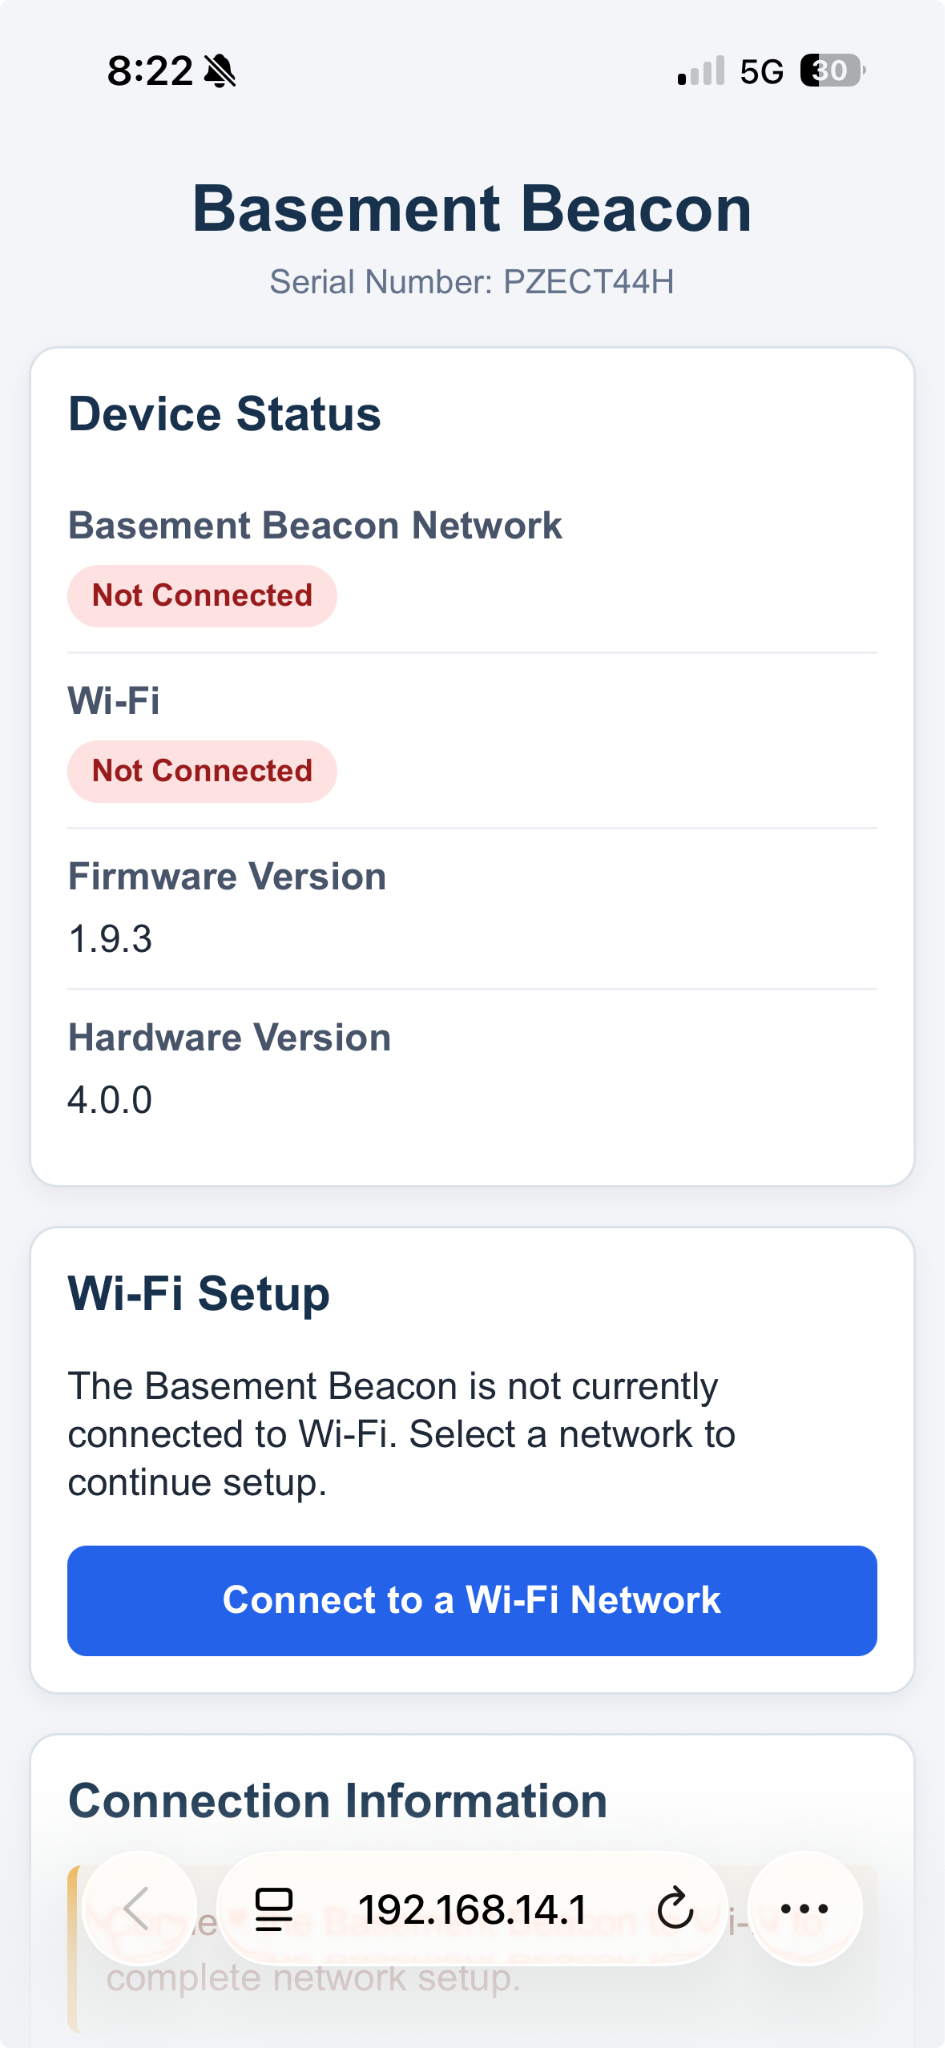
- Tap on the Connect to a Wi-Fi Network button. The MSU will scan for WiFi networks in your home.
- You will then see the Connect to WiFi page. Scroll to see the available WiFi networks.
- To connect to a particular WiFi network, type the password under the chosen network and tap the Connect button.
- After a few moments you should see the Wi-Fi Connected! page if successful. The MSU’s button will glow red when it is connected to your home WiFi network.
- You may now close this page in your browser. The BBEACON WiFi network will now be disabled on the MSU for security.
- Your phone should reconnect to its previous WiFi network. If it doesn’t, go into your WiFi settings on your phone and reconnect to your home WiFi network.
Adding the Main Sensor Unit to the App
To access your Basement Beacon in the app, you will need to add its serial number. Make note of the serial number on the label on the back of the Main Sensor Unit (MSU).
- Open the Basement Beacon app.
- Type the email address and password you created in the Creating an Account section.
- Tap the Sign in button.
- You will then be prompted to add a device in the Devices tab.
- Tap Devices at the bottom of the app.
- Type the serial number of your Basement Beacon in the Serial Number field.
- Tap + Add Device
Installation
Installing the Main Sensor Unit
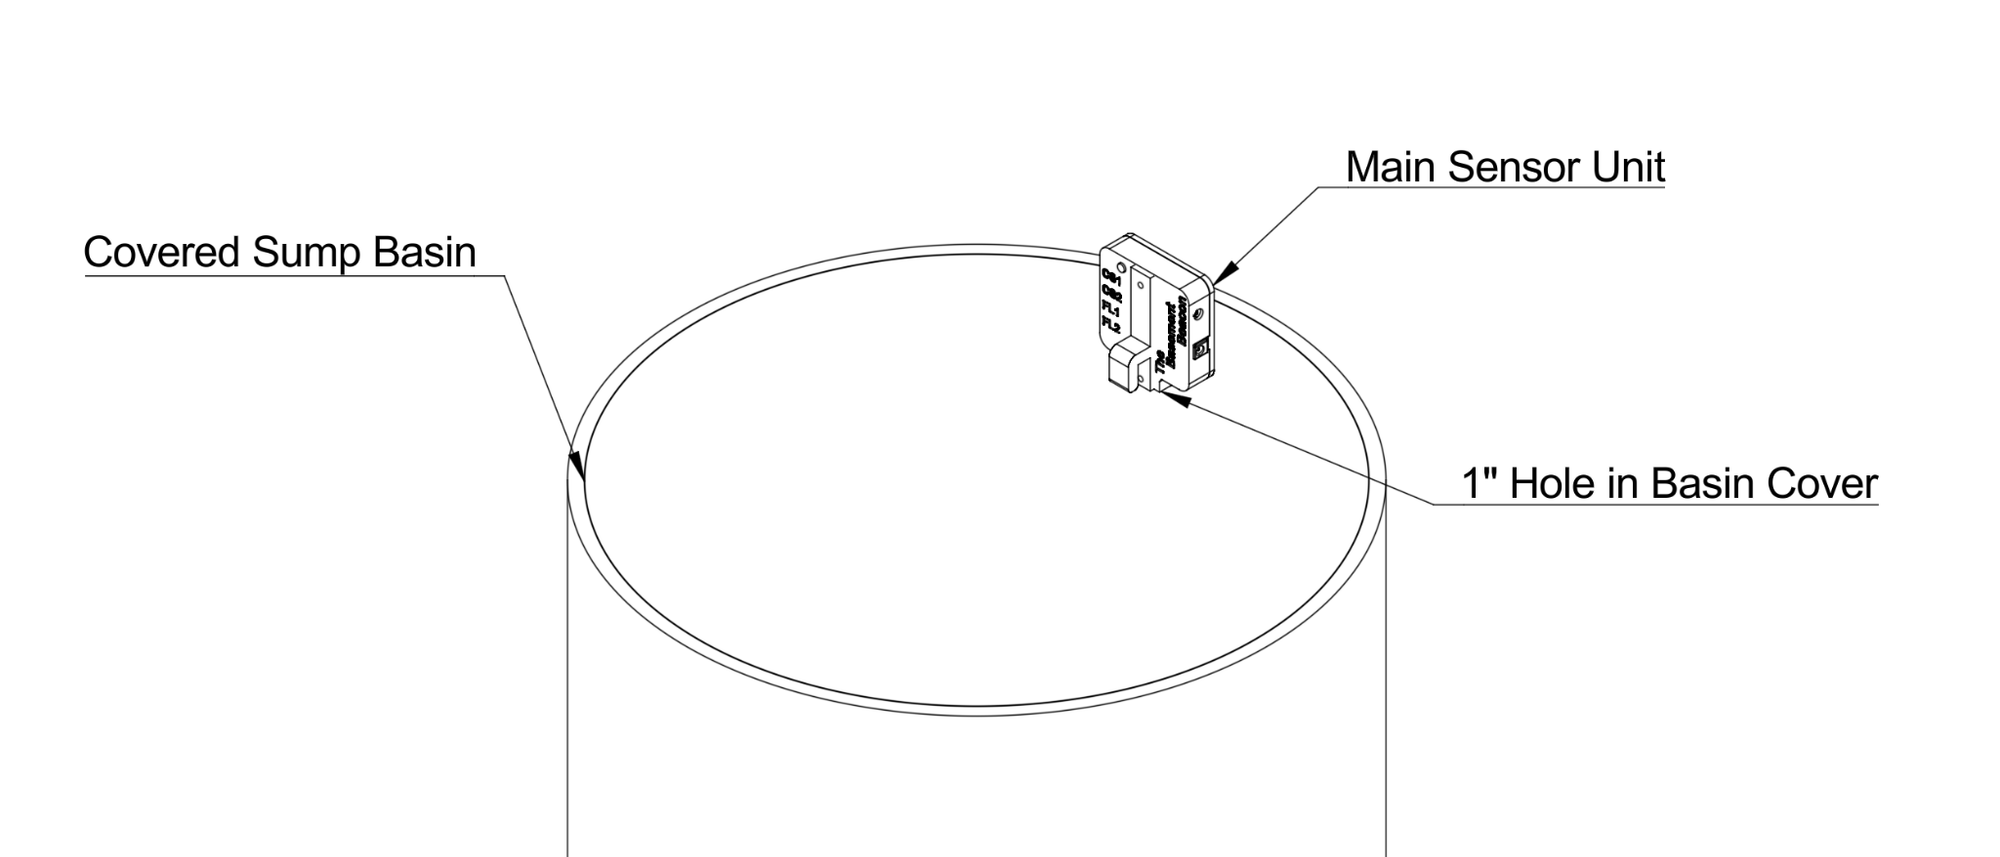
The Main Sensor Unit (MSU) can be used in either an open or covered sump basin configuration. In an open sump basin, the MSU can be hung on the edge using its hook. In a covered sump basin, you will need to drill a 1-inch hole through the cover and let the MSU hang through the hole.
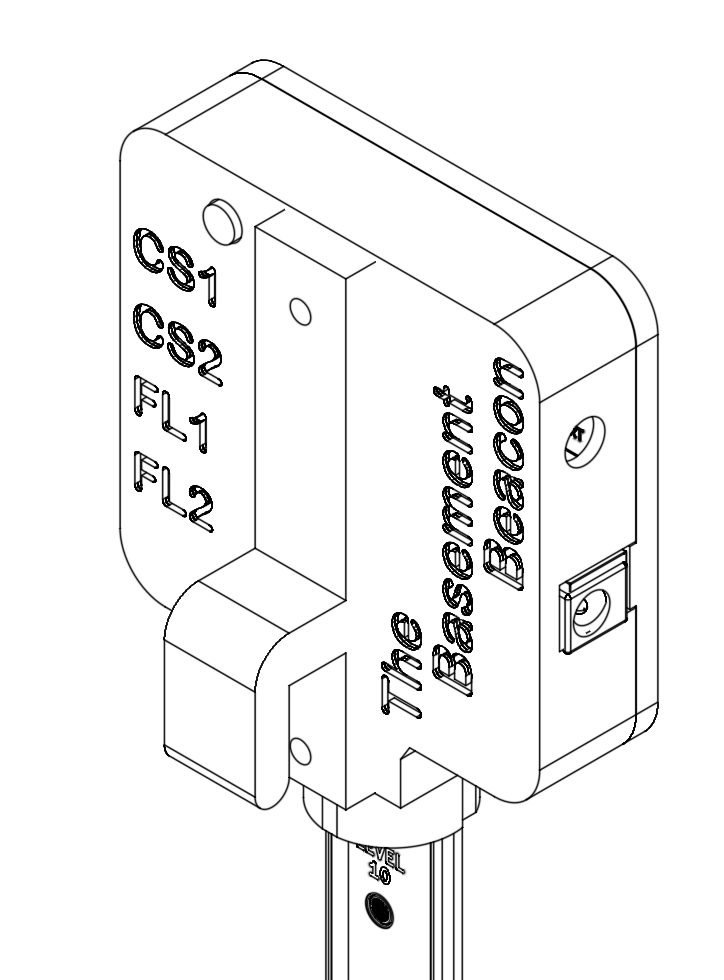
The MSU has a depth sensor that is approximately 18 inches long. This sensor measures the water depth at 2-inch intervals. The lowest water level sensor contains a water temperature probe for calculating the water quality.
Ensure that the depth sensor does not interfere with your sump pump or the sump pump’s float.
The MSU has an external antenna to increase its sensitivity when communicating to a home WiFi network.
If you have a radon mitigation system in your basement with a sealed basin cover, consult with your radon mitigation provider. Girasoli Enterprise makes no claims as to how to properly seal the MSU and sump basin cover.
Connecting the Power Monitor
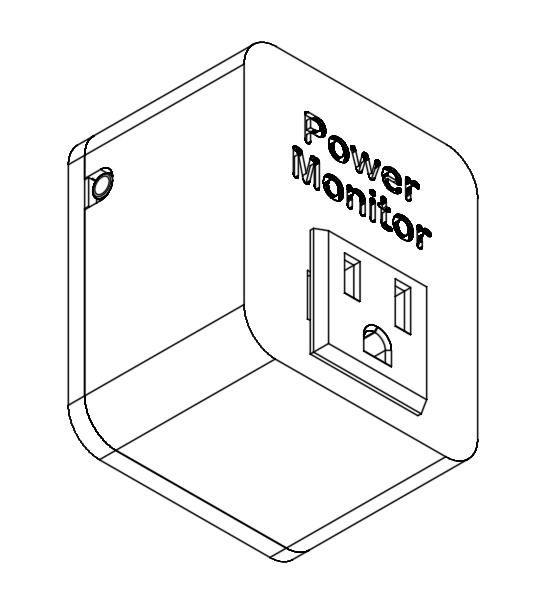
To connect the Power Monitor to your sump pump, unplug your sump pump’s power cord from its AC outlet. Then, plug the Power Monitor into the AC outlet. The Power Monitor must NOT be near the floor where it is at risk of being in contact with water. Plug your sump pump into the Power Monitor’s AC receptacle.
Next, get one of the 6’ data cables that has a 3.5mm stereo plug on each end. Plug one end into the Power Monitor and the other end into the data jack on the MSU labeled CS1. (CS1 is Current Sensor 1 and CS2 is Current Sensor 2.) The Basement Beacon supports sensing two AC powered devices, such as a sump pump and a dehumidifier or an additional sump pump.
Go to the Basement Beacon app and tap on Devices. Under Associated Devices, tap on the gear icon that is next to Basement Beacon Device. Tap the switch next to Enable Current Sensor 1. The switch should slide on, indicating that Current Sensor 1 is now enabled. You can change the Sensor Name of Current Sensor 1 to anything you like (such as Sump Pump).
You can adjust the Current Warning level (in amps) if needed, however, the default of 3 should suffice. This is the threshold at which the MSU detects the sump pump (or any AC device) turning on and off. The Time Alarm (in seconds) will have the MSU alert you in the app if the sump pump is running for longer than this amount. The default of 80 means that if the sump pump runs for longer than 1 minute and 20 seconds, you will get an alert on the app and the audible alarm on the MSU will sound.
Scroll down and tap on the Update Settings button to save your device’s settings. Power off and power on the MSU to force a refresh of settings. Otherwise, the MSU refreshes its settings every 5 minutes from the Basement Beacon Network.
Connecting the Floor Monitor
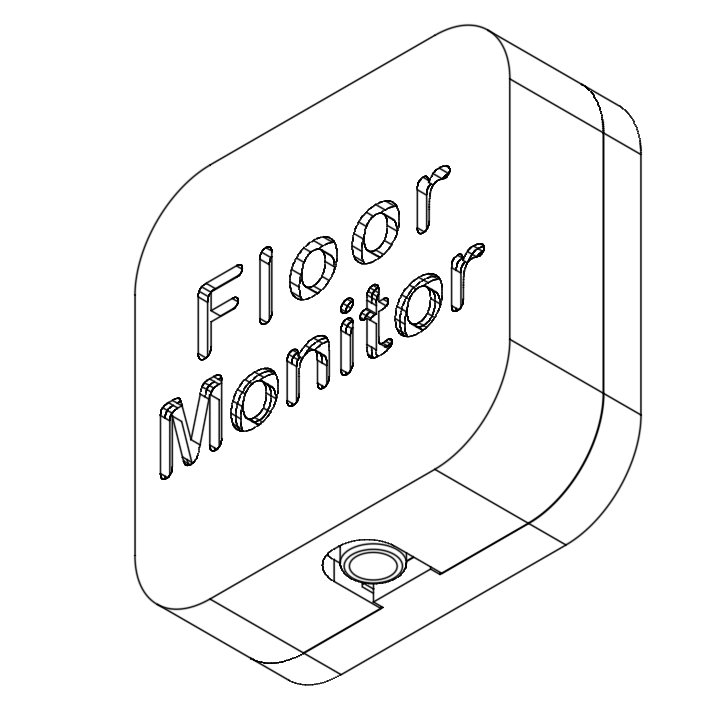
The Basement Beacon supports up to two floor wetness sensors and the basic kit comes with one floor sensor. Using another 6’ 3.5mm stereo cable, connect the floor sensor to the MSU’s data jack that is labeled FL1. (FL1 is Floor Sensor 1 and FL2 is Floor Sensor 2.) If the included 6’ cable is not long enough, you can use any 3.5mm to 3.5mm stereo cable as long as it’s 50 feet or less in length.
Place the Floor Sensor with the “Floor Monitor” embossed label facing up and the stainless steel contacts facing down. If the floor is wet between the stainless steel contacts, you will receive an alert in the Basement Beacon app and the audible alarm will sound on the MSU.
In the Basement Beacon app, tap on Devices and then tap on the gear icon next to the Basement Beacon Device. You can change the sensor name for Floor Sensor 1 (the default name is “Floor Monitor 1”) to anything you like such as Sump Area. After making any changes, scroll to the bottom and tap Update Settings.
The Dashboard
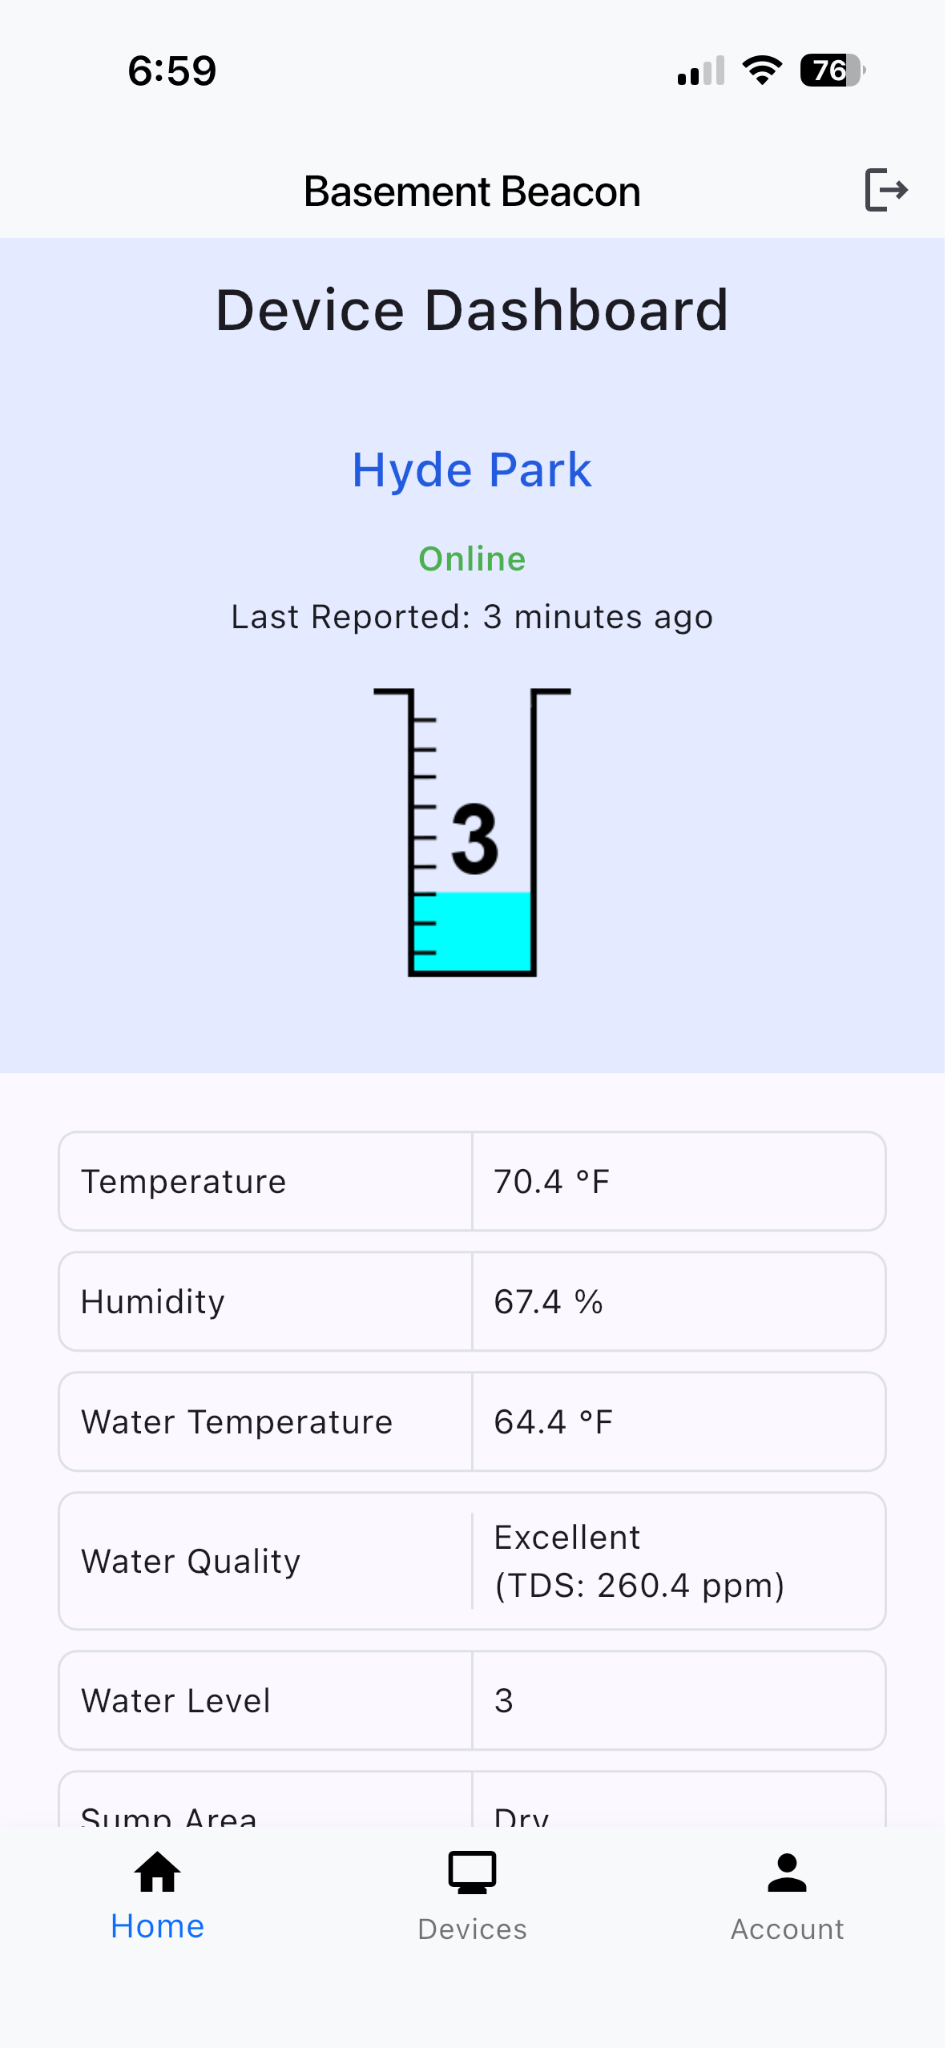
The main screen of the Basement Beacon app is the Device Dashboard. This is where you can see the vitals of your basement, including the level of water in your sump basin as well as the water quality (when water is present at Level 1). Water quality is a measure of total dissolved solids (TDS). If the TDS is too high, this can indicate poor water quality for drinking and for HVAC systems, if you use the same groundwater source for these systems as your sump basin.
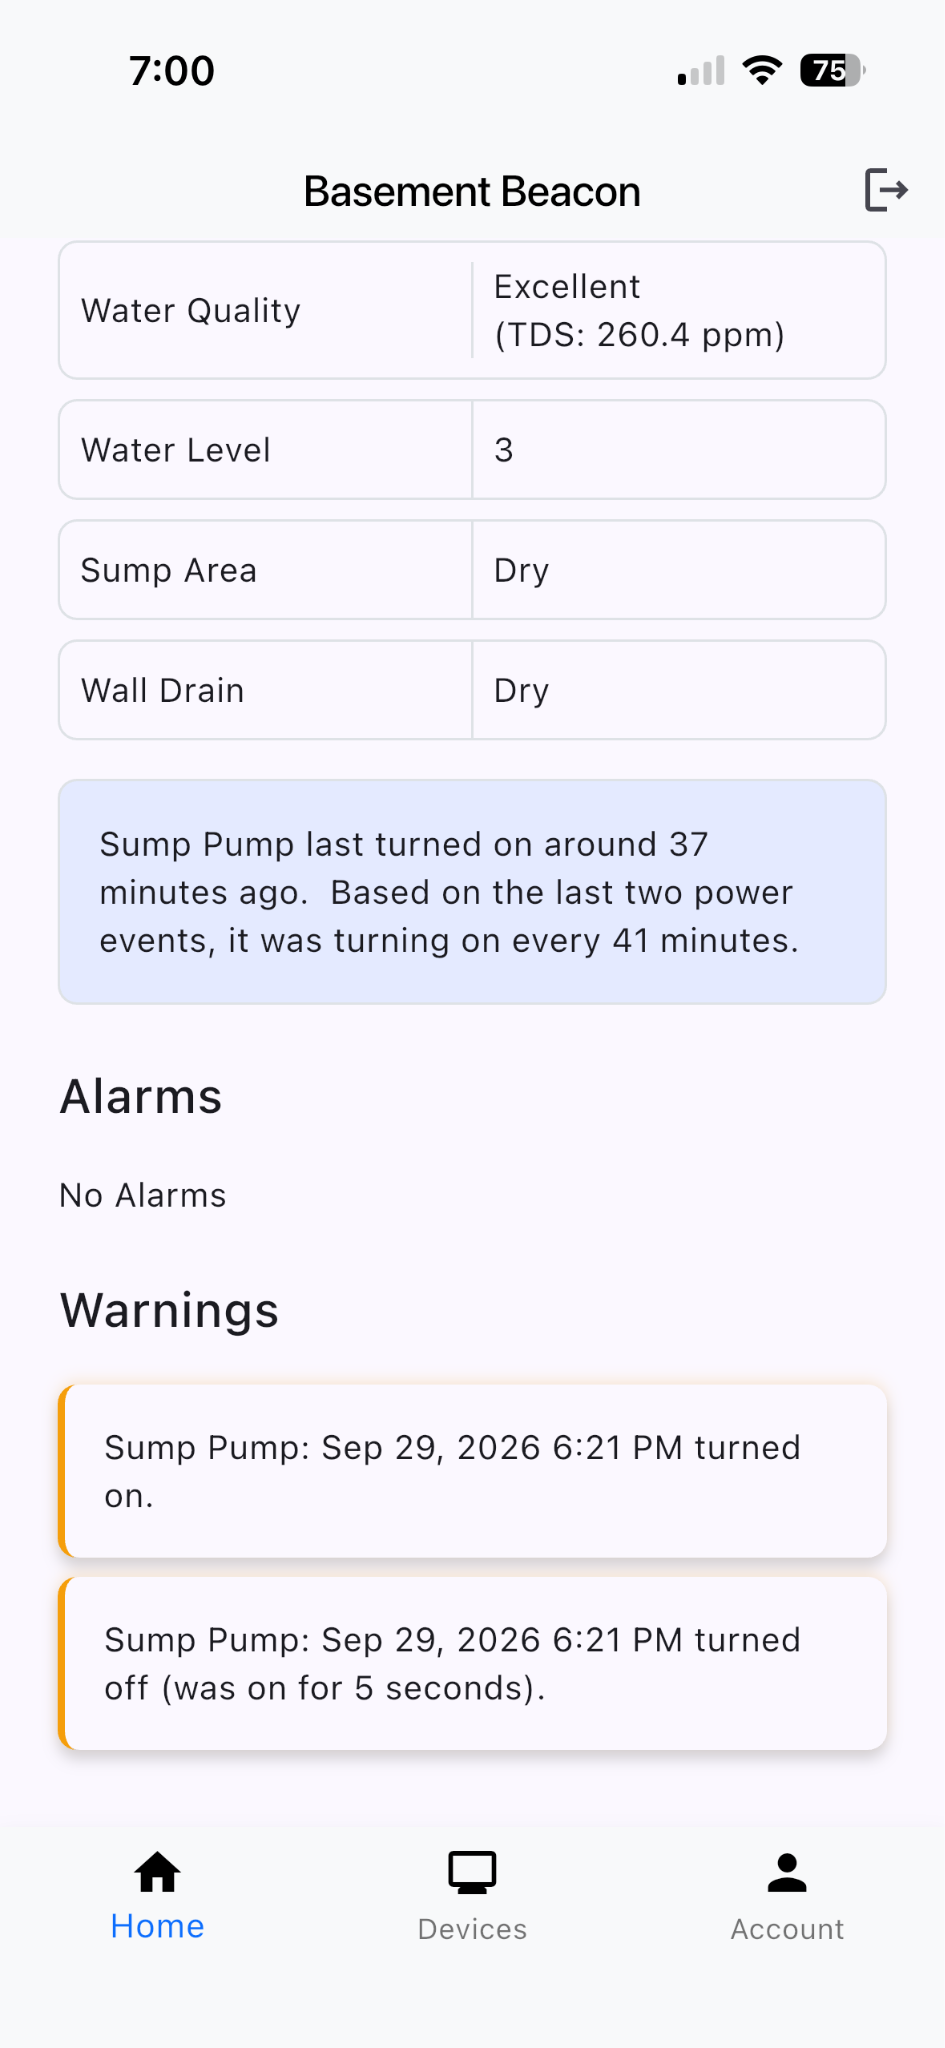
Scrolling down, you will see the most recent alarms and warnings. Swipe down on this screen to refresh these data. You will not see any information on devices connected to CS1 or CS2 (like your sump pump turning on/off) until your CS1 / CS2 device turns on for the first time.
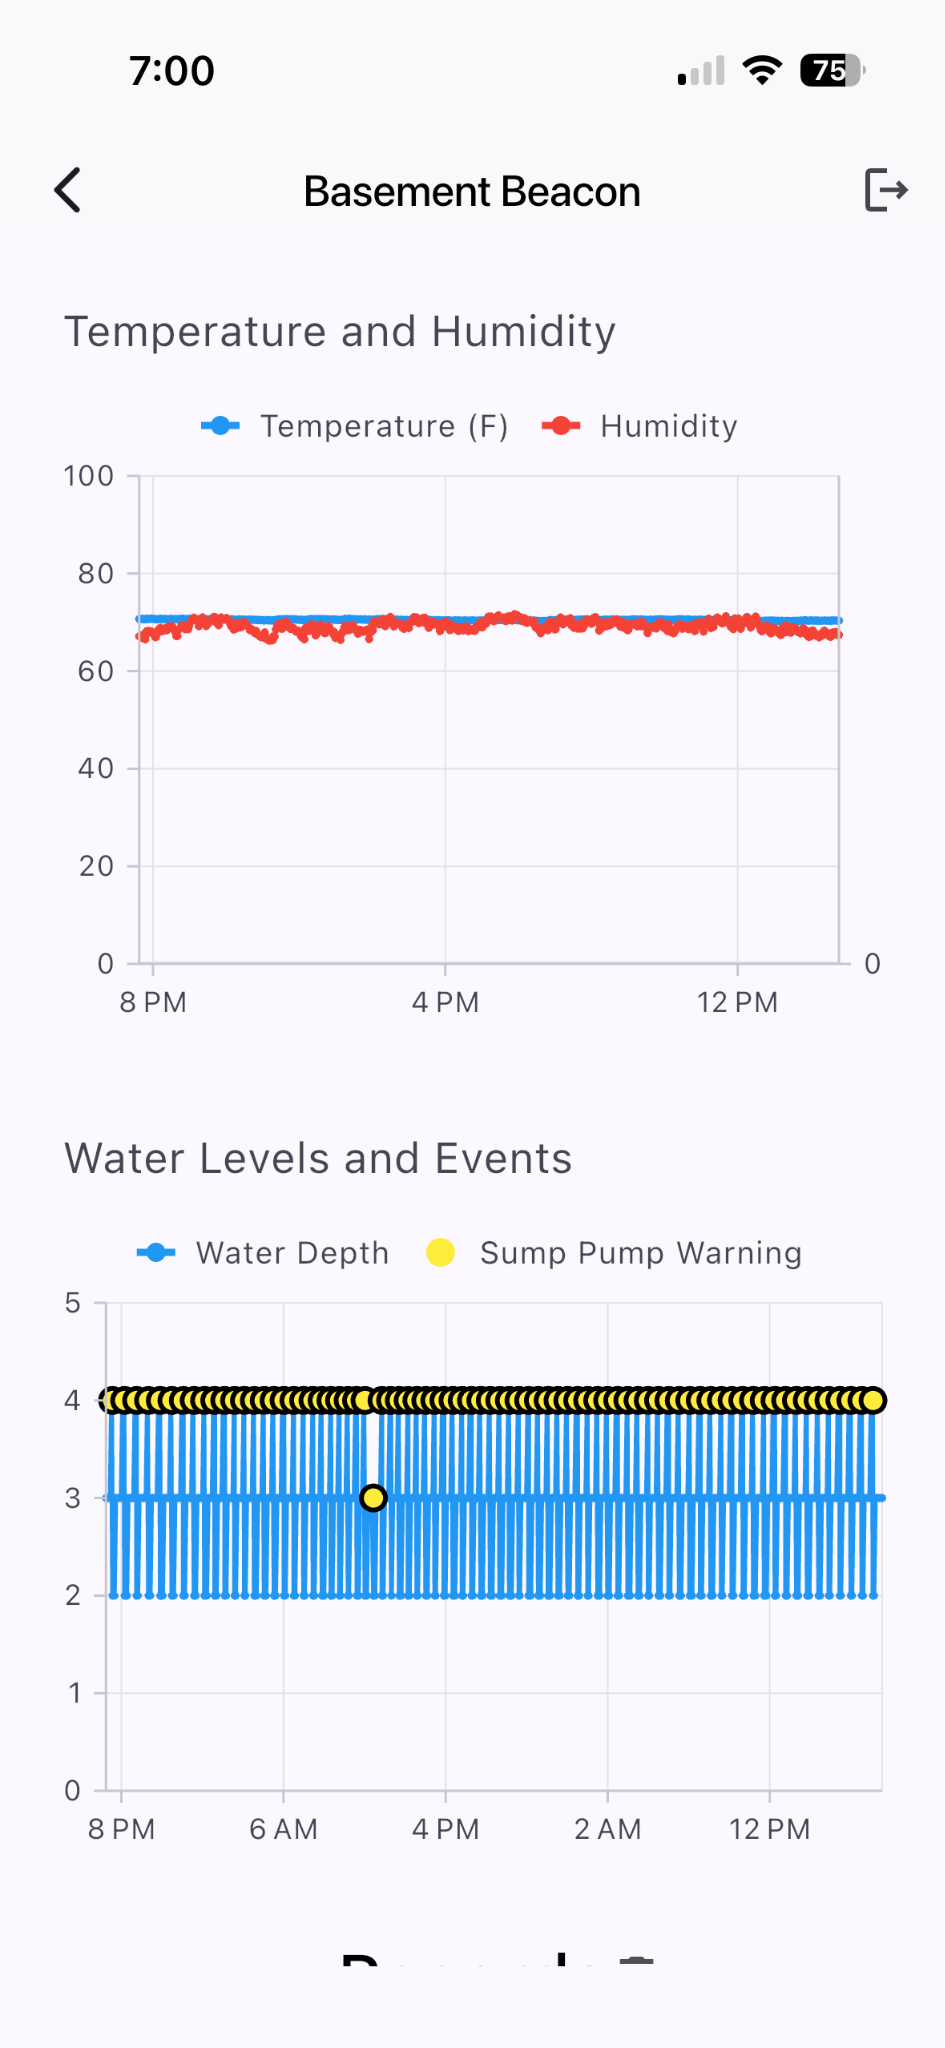
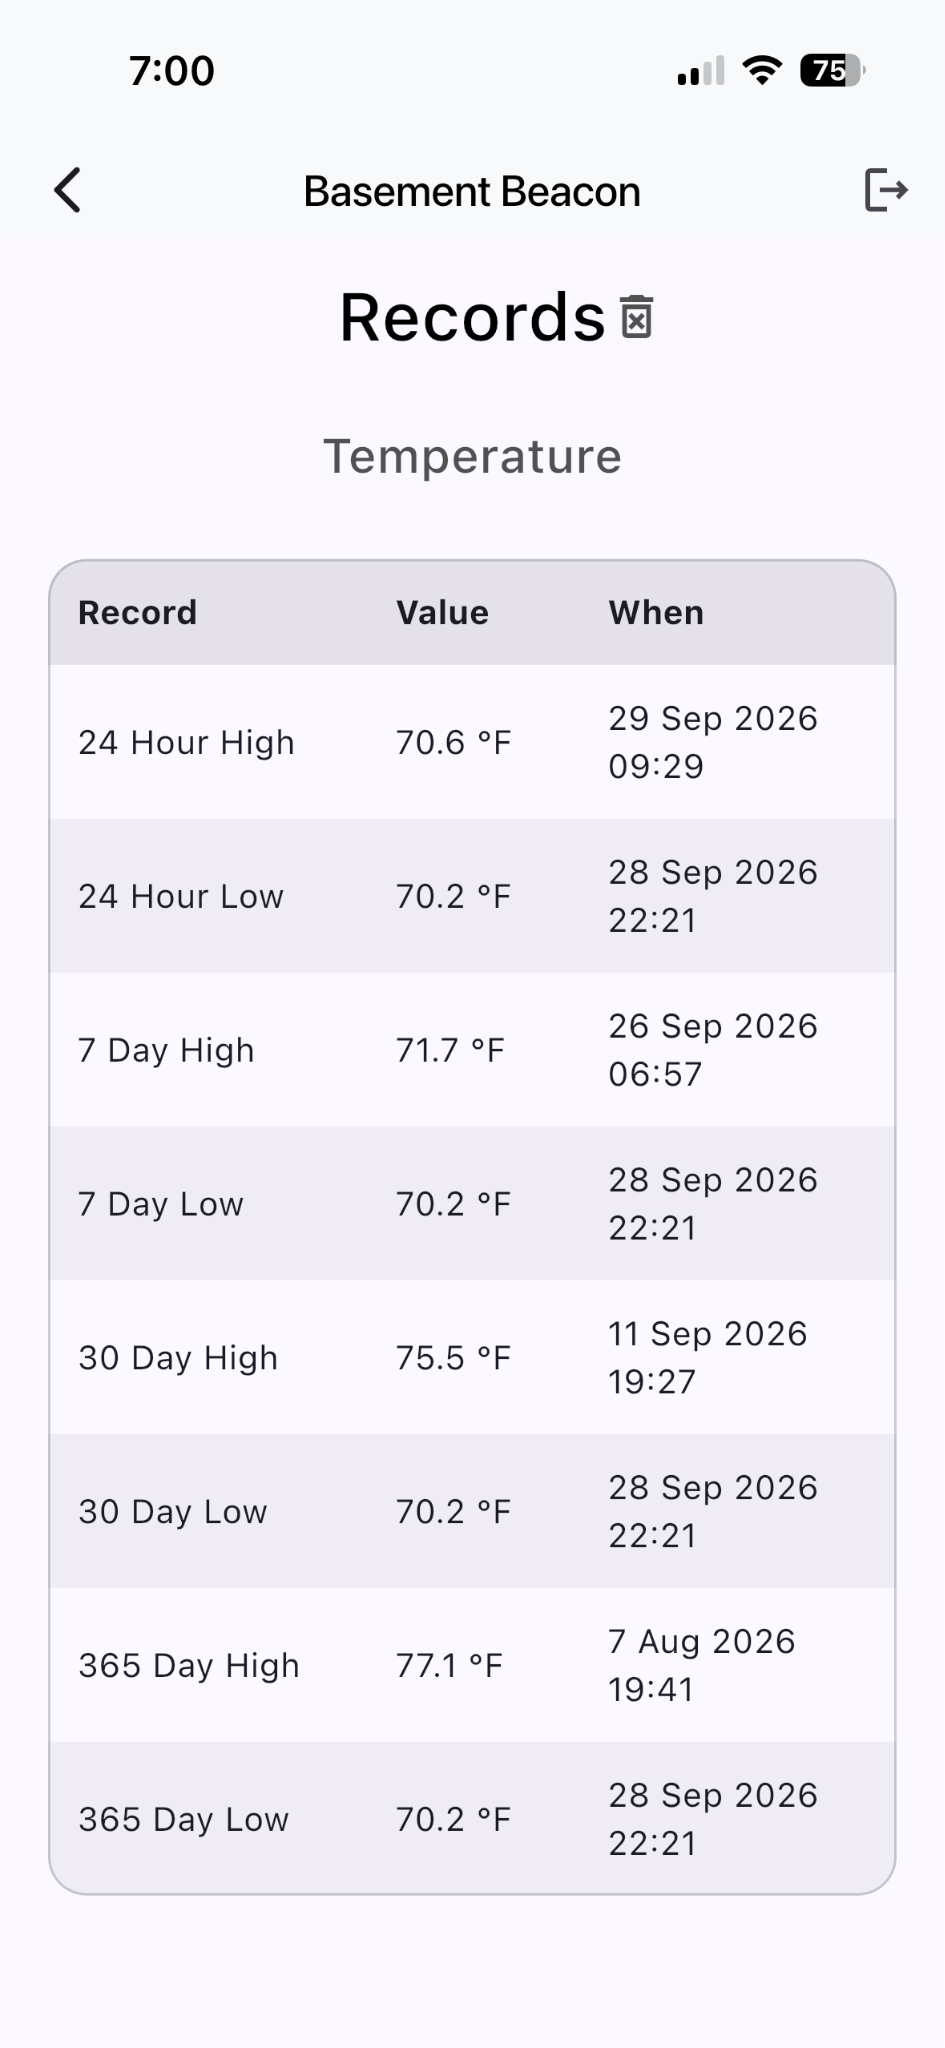
Tapping on your Basement Beacon’s name will bring you to the device metrics. Here you can see your basement’s temperature (in blue) and humidity (in red) over time. In the Water Levels and Events chart, you can see the change in water depth (in blue) over time with any associated events like the sump pump turning on. Scrolling down, you will see your basement records for 24 hours, 7 days, 30 days, and 365 days. To clear the records, tap on the trash can icon next to Records.
Changing the Settings of your Basement Beacon
In the Basement Beacon app, tap on Devices and then tap on the gear icon next to the Basement Beacon Device. You can change the following settings:
- Device Name: This is a unique name that you can give your Basement Beacon.
- Humidity Warning: This is the humidity level that will trigger a warning in the app. The default is 80.
- Humidity Alarm: This is the humidity level that will trigger an alert in the app as well as an audible alarm at the Main Sensor Unit (MSU). The default is 90.
- Temp Warning: This is the temperature that will trigger a warning in the app. The default is 79F or 26C.
- Temp Alarm: This is the temperature that will trigger an alert in the app as well as an audible alarm at the MSU. The default is 90F or 32C.
- Water Level Warning: This is the water level on the depth probe that will trigger a warning in the app.
- Water Level Alarm: This is the water level on the depth probe that will trigger an alert in the app and an audible alarm at the MSU.
Account Settings
You can change your account settings by tapping the Account icon. Here, you can set your demographics as well as your temperature unit preferences. You can turn off (and on) app alerts for alarms and warnings if needed by turning off Message on Alarm and Message on Warn. Be sure to tap Update Settings to save your settings.
Tapping on the Change Password button will allow you to change your password. Below this is a list of the last devices used to access your Basement Beacon data. If you need to delete your account and all of your data, tap on the Delete Account button. This is destructive and will delete everything. Should you follow through with this button, you would need to create a new account and start over again to connect to the Basement Beacon network.
Home Assistant / MQTT
To enable Home Assistant / MQTT, tap on the Devices icon. Tap on the gear icon next to your Basement Beacon device. In the setting page, scroll down to the bottom. Tap the switch next to Home Assistant / MQTT to turn this feature on. Fill in the appropriate information and tap the Update Settings button.
Alexa
If you have an Alexa device, to enable Alexa, go to the Amazon Alexa app on your phone. In the “Ask Alexa” area, enter “skills.” Tap on “Alexa Skills & Integrations.” In the “Search Alexa Skills” search bar at the top, enter: Basement Beacon. Choose Basement Beacon from the list of skills.
In the Basement Beacon skill, do the following:
- Tap the Settings button
- Tap Link Account
- Enter your Basement Beacon login information.
- Tap Link Account
If the linking is successful, you can tap Close.
You can try the following phrases with your Alexa device:
- “Alexa, ask Basement Beacon for status.”
- “Alexa, ask Basement Beacon for the temperature.”
- “Alexa, ask Basement Beacon for the humidity.”
- “Alexa, ask Basement Beacon for what the water level is.”
- “Alexa, ask Basement Beacon if there are any alerts.”
Factory Reset
If you need to reset the Basement Beacon to its factory settings, unplug the power from the Main Sensor Unit (MSU). Hold down the button on the MSU, and then plug in the power. The MSU will beep four times and then two times to indicate that all settings have been erased and set to the factory defaults.
Updating the Firmware
If you are instructed to update the firmware, you will need to directly connect to the MSU from a web browser. Updating the firmware works easiest from a computer rather than a phone. In the Basement Beacon app, tap on Devices and then tap on the gear icon next to your device. Next to “IP” is the local IP address of your Basement Beacon. Tap on the icon next to the IP address and it will be copied to your clipboard. Go to a web browser and paste the IP address in the address bar.
Scroll to the bottom and under the Maintenance section, tap on Firmware Upgrade. Browse for the firmware file and tap on the Update Firmware button. The new firmware will be loaded and your MSU will reboot.